A PDF sample of the Practical Photoshop® 2022, Level 1 containing the Overview, Tutorial 1, and Tutorial 2 is available for download.
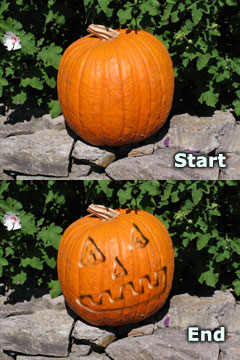
These chapters describe the Photoshop interface, show you how to "carve" a pumpkin Photoshop style, and explains how to use the Save for Web dialog box. You may also want to download the pumpkin image used in the step by step parts of Tutorial 1.
Visit the Store page to purchase a copy of this book.
Tutorial 1 • 2 • 3 • 4 • 5 • 6 • 7 • 8 • 9 • 10 • 11 • 12 • 13 • 14 • 15
 Tutorial 1: Photoshop Basics
OBJECTIVES
Identify the major regions of the Photoshop workspace.
Use the Workspace Switcher.
Manipulate and customize panels.
Open and navigate a Photoshop document.
Explore Photoshop Help.
Create a simple layered Photoshop document from a provided starting image.
Tutorial 1 • 2 • 3 • 4 • 5 • 6 • 7 • 8 • 9 • 10 • 11 • 12 • 13 • 14 • 15
 Tutorial 2: Files for Print and Web
OBJECTIVES
Differentiate among monitor, document, and printer resolutions, and understand when to use
each measurement.
Distinguish between appropriate resolution for print and for Web or email images.
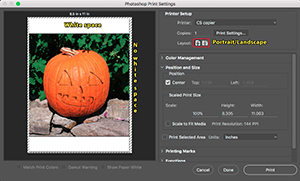
Print a Photoshop document by configuring the Print dialog box.
Use the Export As and Save for Web commands to make a copy of the print-quality document for fast online transmission.
Tutorial 1 • 2 • 3 • 4 • 5 • 6 • 7 • 8 • 9 • 10 • 11 • 12 • 13 • 14 • 15
 Tutorial 3: Selection
OBJECTIVES
Differentiate between selected and unselected regions of a document.
Use the appropriate selection tool and its options to create and modify selections.
Preview and tweak selection edges using the Refine Edge dialog box.
Transform selections.
Save and load selections.
Copy and paste selections.
Tutorial 1 • 2 • 3 • 4 • 5 • 6 • 7 • 8 • 9 • 10 • 11 • 12 • 13 • 14 • 15
 Tutorial 4: Layers
OBJECTIVES
List at least three advantages for working with layered documents.
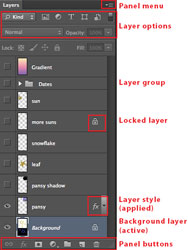
Identify the major landmarks of the Layers panel.
Use the Layers panel and menu commands to create, hide, display, duplicate, group, link, lock, or delete layers.
Understand the makeup and capabilities of the Background layer and standard or “pixel” layers.
Describe the special characteristics of the Background layer.
Create, name, and reorder layers and groups.
Change layer Opacity and Fill.
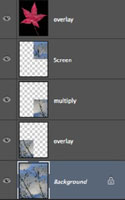
When blending layers, identify the blend color, the base color, and the result color in the document window.
Differentiate blend modes from layer styles.
Change the blend mode of various layers, and observe the effects.
Enhance layers with layer styles.
Tutorial 1 • 2 • 3 • 4 • 5 • 6 • 7 • 8 • 9 • 10 • 11 • 12 • 13 • 14 • 15
 Tutorial 5: Layer Case Studies
OBJECTIVES
Use the File > New command to set up blank Photoshop documents.
Identify the special characteristics of a Type layer.

 Create, edit, and format Type layers.
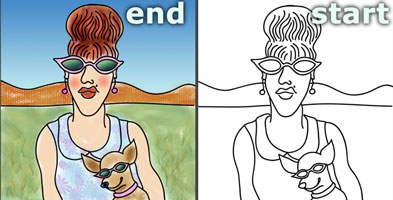
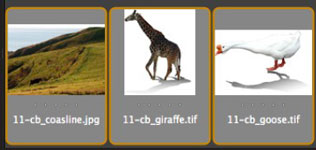
Build composite images by combining layers from multiple sources.
Use the History panel to compare states, make snapshots, and create documents from History states.
Use Layer Groups effectively for Layers panel organization.
Experiment with layer blend modes, opacity, fill, and stacking order.
Create a document by using a template layer.
Tutorial 1 • 2 • 3 • 4 • 5 • 6 • 7 • 8 • 9 • 10 • 11 • 12 • 13 • 14 • 15
 Tutorial 6: Painting
OBJECTIVES
Select colors using the Color Picker, Color panel, Swatches panel, and the Eyedropper tool.
Configure the Brush tool using the Brush Preset Picker and the Options bar.
 Differentiate between the Brush and Pencil tools.
Use the Paint Bucket and Gradient tools to fill areas with colors and patterns.
Create and use Fill layers.
Tutorial 1 • 2 • 3 • 4 • 5 • 6 • 7 • 8 • 9 • 10 • 11 • 12 • 13 • 14 • 15
 Tutorial 7: Image Sources & Resolution
OBJECTIVES
Define copyright, and give at least one reason why it is unethical (and probably violates copyright
law) to copy images off the Internet without permission.
Describe how to embed and read a digital watermark.
Visit at least one online image source, read its fair use agreement, and download an image.
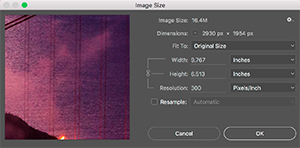
Use the Image Size dialog box to evaluate image resolution, and change image sizes.
Explain the relationship between image interpolation and resampling.
Relate the megapixels that digital cameras capture to image pixel dimensions, and print size and resolution.
Change the print resolution of a digital camera image with and without resampling, and evaluate the consequences of each.
Scan a photograph directly into Photoshop.
Tutorial 1 • 2 • 3 • 4 • 5 • 6 • 7 • 8 • 9 • 10 • 11 • 12 • 13 • 14 • 15
OBJECTIVES
Identify basic design principles —
proximity, alignment, repetition, contrast, etc. and explain how to apply these principles to compositions.
Examine the photographic principles listed in Adobe’s ACA study prep guide, and apply them to photographic examples.
Use the photographic design principles to crop photographs.
Tutorial 1 • 2 • 3 • 4 • 5 • 6 • 7 • 8 • 9 • 10 • 11 • 12 • 13 • 14 • 15
 Tutorial 9: Adobe® Bridge® & Automation
OBJECTIVES
Move back and forth between Bridge and Photoshop.
Explain what Camera Raw is, and how to use Bridge as an intermediary to open Raw files.
Identify the major landmarks of the Bridge application, and its preset workspaces (Filmstrip shown here).
Use Bridge to:
Assign ratings, and reorganize images by rating.
View and edit non-image file information called metadata.
Preview a Camera Raw file, and open it in Photoshop.
Use File > Automate to:
Make a contact sheet with Contact Sheet II.
Use Crop and Straighten Photos to separate multiple images scanned at one time.
Create a PDF presentation.
Create a panoramic image using the Photomerge command.
Tutorial 1 • 2 • 3 • 4 • 5 • 6 • 7 • 8 • 9 • 10 • 11 • 12 • 13 • 14 • 15
OBJECTIVES
Delineate the steps you should take to correct or restore a photograph.
Evaluate image tone with the Histogram panel.
Use the Brightness/Contrast command to improve image tone.
Explain the benefits of using Adjustment layers over the Image > Adjustments commands.
Identify the key landmarks of the Adjustments panel and the associated Properties panel.
Improve image tone with the Levels adjustment.
Modify adjustment layers using the Properties and Layers panels.
Tutorial 1 • 2 • 3 • 4 • 5 • 6 • 7 • 8 • 9 • 10 • 11 • 12 • 13 • 14 • 15
 Tutorial 11: Adjusting Image Colors
OBJECTIVES
Delineate the additive (RGB) and subtractive (CMY) primary colors and memorize the opposite colors for each.
Explain the purpose of color channels.
Use the Info panel to assess image tone and color.
Identify and correct an image with a color cast.
Make a Color Balance adjustment to improve an image.
Use the Color Range command to select specific colors, and the Replace Color command to change specific colors.
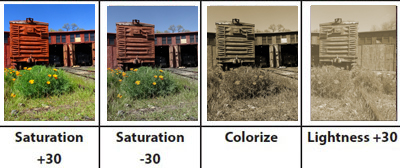
Differentiate among hue, saturation, and lightness.
Use the Hue/Saturation adjustment to alter image colors and tones.
Tutorial 1 • 2 • 3 • 4 • 5 • 6 • 7 • 8 • 9 • 10 • 11 • 12 • 13 • 14 • 15
 Tutorial 12: Painting with Special Tools
OBJECTIVES
Use the Clone Stamp Tool to remove unwanted artifacts in an image.
Compare the Clone Stamp Tool with the Spot Healing Brush Tool.
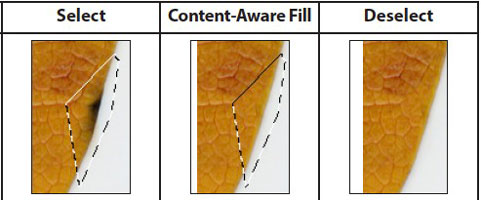
Improve some Spot Healing Brush Tool corrections by using the Edit > Fill command with the Content-Aware option.
Reposition and fill “missing” image elements with the Content-Aware Move Tool.
Use the Red Eye Tool to fix photographs with subjects with inappropriately red eyes.
Paint with History states using the History Brush Tool.
Compare the History Brush Tool with the Art History Brush Tool.
Tutorial 1 • 2 • 3 • 4 • 5 • 6 • 7 • 8 • 9 • 10 • 11 • 12 • 13 • 14 • 15
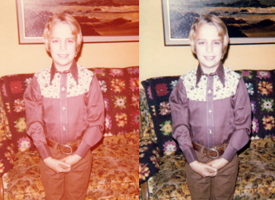 Tutorial 13: Restoration Case Studies
OBJECTIVES
Understand why it is important to avoid automatic scanning settings when scanning photographs for
restoration.
Repair an aged and damaged color photograph
Fix an image with “pet eye.”
Restore a grayscale image.
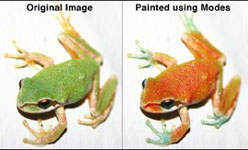
Colorize a grayscale image with Hue/Saturation, and by painting on a layer set to Color blend mode.
Sharpen a photograph using the High Pass Filter technique.
Tutorial 1 • 2 • 3 • 4 • 5 • 6 • 7 • 8 • 9 • 10 • 11 • 12 • 13 • 14 • 15
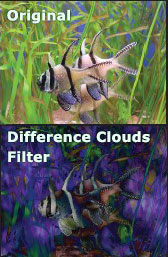 Tutorial 14: Fun with Filters
OBJECTIVES
List guidelines for achieving optimal results from Photoshop filters.
Identify the various sections of the Filter menu.
Apply the Clouds and Difference Clouds filters.
Compare the use of the Motion Blur filter on an entire layer with its use on selected regions of that layer.
Use the Lens Flare filter.
Use the Liquify filter to stretch, twist, and distort images.
Tutorial 1 • 2 • 3 • 4 • 5 • 6 • 7 • 8 • 9 • 10 • 11 • 12 • 13 • 14 • 15
 Tutorial 15: Putting it All Together
OBJECTIVES
Compare the (standard) Eraser Tool with the Magic Eraser Tool and the Background Eraser Tool.
Define custom patterns.
Use the Pattern Stamp Tool.
Define Presets.
Save and load Preset Libraries from the Presets Manager.
Tutorial 1 • 2 • 3 • 4 • 5 • 6 • 7 • 8 • 9 • 10 • 11 • 12 • 13 • 14 • 15
A PDF sample of the Practical Photoshop® 2022, Level 1 containing the Overview, Tutorial 1, and Tutorial 2 is available for download.
These chapters describe the Photoshop interface, show you how to "carve" a pumpkin Photoshop style, and explains how to use the Save for Web dialog box. You may also want to download the pumpkin image used in the step by step parts of Tutorial 1.
Visit the Store page to purchase a copy of this book